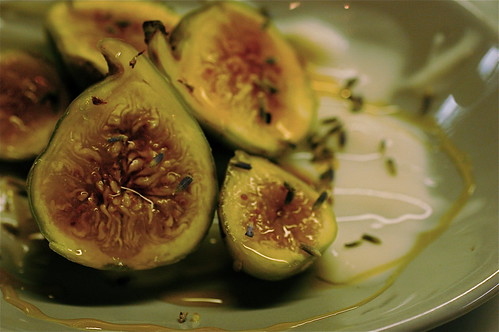
A wonderful weeknight dessert.
Halve fresh figs (I used green California figs, though you could also use mission). Serve two or three per person. Swirl french vanilla yogurt on small serving plates. Top with halved figs, and drizzle 2 tsp. organic honey on each plate. Sprinkle with lavender.
Amazingly good.
Thursday, July 31, 2008
Delectable
Wednesday, July 30, 2008
Not your mama's mac and cheese.
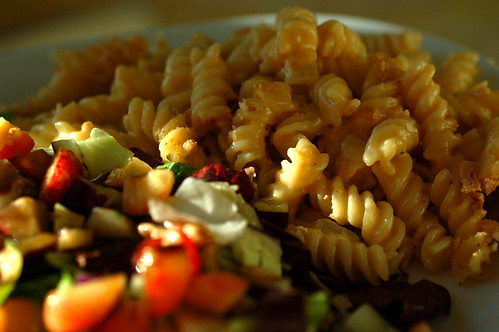
Ingredients:
1 box rotini
1 cup skim milk at room temperature (you can use a higher fat content milk, we just don't ever have any in the house, so I used what we had)
2 cups shredded cheese (you can use any type - I used about 1 cup of a gouda infused with vegetables, and then 2 slices of crumbled muenster and 1 cup of a mix of monterey jack, medium cheddar, queso quesadilla and asadero cheese)
1 heaping tbsp white flour
2 tbsp butter
1/3 white onion, diced (can be omitted if your family won't eat onions, but the taste won't be as rich)
freshly cracked blacked pepper
2 tsp brown mustard (NOT yellow mustard - do not omit)
4 flatbread crackers (or 8 regular crackers) - crushed
Put a large pot of water on high heat to boil. In another large saucepan, melt butter. Add onions and stir until translucent. Make a roux by adding one heaping tbsp of white flour and stir constantly until flour is incorporated completely and golden brown. Turn oven on to 325F. Add milk and cheese to roux. Stir in 2 tsp brown mustard to sauce - I promise you will not taste mustard in the finished product, but it will taste much richer than regular mac & cheese. Stir constantly until sauce is smooth. Drain pasta, pour into a buttered casserole dish. Pour sauce over pasta and stir to coat. Sprinkle with crushed flatbread and bake at 325 for 15 minutes until heated and bubbly with a slight hint of golden brown on the top.
This makes a LOT of food. But it's very good. A hint - if you're reheating it, put a little milk in the pasta before you reheat it so it doesn't dry out.
Served with a raddichio and butter lettuce salad with peeled english cucumbers, rainier cherries (a yellow fleshed fruit that's a cross between a Bing and a Van cherry) and diced purple sweet peppers, with a basic balsamic dressing.
Yophuria
 When we were in Whole Foods, I saw a bottle of Yophuria while walking between the frozen section to dairy to pick up my lovely delicious Fage yogurt. We eat a lot of yogurt in this house, and we love wine. So wine plus yogurt... sounded intriguing. I'd never heard of anything like that before.
The company website provides the following snippet -
------
A new product from Germany just made our wishes come true: YOPHORIA!
Take the known proven benefits of moderate wine consumption. Now add the vitamins, minerals and immune system boost of delicious yogurt. Combine with a luscious fruit taste and a fizzy sensation, and top it off with absolutely no fat or cholesterol! You have a heavenly refreshing adult beverage that you can enjoy at the beach, at a party or with someone special.
While others are raving about the latest drink fad that are sure to pack on the pounds and provide zero benefits other than love handles and a hangover, you can savour the flavor of Yophoria's Natural Fruit Wine and Yogurt in our glamourous Champagne-style bottle, guilt free!
Mouth-watering flavors such as Peach and Strawberry are currently available, while you will soon be able to enjoy the taste of Apple or Blueberry!
Yophoria is the Smart Choice in adult beverages. Try one today!
------------
My review isn't as glowing. Let's just say that it was far from making my dreams come true, but then again I've never dreamed of alcoholic yogurt. Perhaps I need to expand my horizons. I thought it tasted odd, not bad really - but the effervescent peach-yogurt-wine taste was just too much for me, I guess. One little bottle just filled two saucer style champagne glasses. Honestly, I took one sip and gave the rest to Patrick. When he asked for his review, he gave a thumbs up and said he liked it "mucho."
It was a great concept, but I think it was a bit lacking in execution. He loved it.
I think this is something we're going to have to agree to disagree on.
Daily Tip - Personal space while sautéing
When sauteing, make sure that you leave enough room amongst the pieces of food so that you can see the bottom of the pan. If you have too much food in the pan, the food will lower the temperature of the pan and create a lot of steam. Excess steam will prevent even browning.
Another tip for sauteing is to make sure the food you add into the pan is dry - you can simply blot it with a kitchen cloth or paper towel.
Another tip for sauteing is to make sure the food you add into the pan is dry - you can simply blot it with a kitchen cloth or paper towel.
Monday, July 28, 2008
Tip of the Day - Chocolate Cake Secret Ingredient
Anytime you're making a chocolate cake (either from scratch or pre-made mix), include a tablespoon of distilled white vinegar. You won't be able to taste the vinegar in the finished product, and you'll be amazed at how moist and springy your cake will be.
Smashed new potatoes with garlic scapes, shrimp and broccoli

Smashed new potatoes with garlic scapes
Cut up scrubbed new potatoes (estimate 2-4 small potatoes per person) and one cut up garlic scape per serving and cover with water. Drain, and just cover again with water (the first round helps eliminate some of the starch from the potatoes). Cook over medium high heat until fork tender. Drain. Mix in a splash of milk and 1 oz. per serving of goat cheese. Smash with a potato masher. Sprinkle with Hawaiian black lava sea salt.
Garlicky shrimp
Put 1 tablespoon of butter into a non-stick frying pan and combine with 2 tbsp. sodium free seasoning blend (I use a Kirkland organic blend - a Costco product) and 1 pound of thawed shelled shrimp. Stirring gently, cook until shrimp turn bright pink.
Serve shrimp and potatoes with fresh steamed broccoli. The extra sauce from the shrimp makes an excellent topping on both the broccoli and the potatoes.
Sunday, July 27, 2008
Daily tip - flavorful ice cubes
My first semester of law school, I started drinking coffee in earnest.
It's been a torrid love affair since.
When I first started practicing law in Miami, I would have a large (16 oz. minimum) cup of coffee on my way to work while stuck in traffic on I-95. Sometimes it took just that much to get me through the Golden Glades interchange, and I'd have to stop on the way for another. Then, once at work, I'd easily down another 5-6 cups before 3 p.m. when it was time for cuban coffee. While living there, I got hooked on iced coffees, since the weather doesn't often dip below 70 degrees - there's not much use for hot coffee.
When I got pregnant with Julian, I gave up coffee cold turkey as soon as I found out. I was not, let's say - a pleasant person to be around during the "detox" phase. Now that he's here, I still occasionally have a cup or two, but not nearly as often as I used to indulge.
Last week, I was reminded of a tip that I loved to use when still living in South Florida. Freeze coffee (even with cream and sugar, if that's how you take yours) into ice cube trays, and pop them out into freezer bags once frozen. Use these instead of regular ice in your iced coffee and you won't have a diluted drink when the weather is swelteringly hot.
You can use this same principle to prevent any drink or punch from being watered down.
Gooseberry and Blueberry Crumble with Maple Yogurt

I'd never cooked with gooseberries before I saw them in the farmers' market a few weeks ago. They're good, though surprisingly tart. Apparently the growing season is only three to four weeks long, so make sure that you snap them up when you see them in the market or grocery store. With their slight wine taste, and rhubarb for most recipes. I combined them with sweet blueberries to try to ameliorate the lip puckering tartness.
Ingredients
2 cups gooseberries "topped and tailed" (the ends pinched off)
2 cups fresh blueberries
1 scant cup sugar
1 1/2 cups plain flour
1/3 cup butter
1/3 cup brown sugar
1/2 tsp ground cinnamon
maple yogurt (I used Wallaby, an Australian style yogurt I found at Whole Foods. You could use plain vanilla yogurt and mix in a tablespoon of good maple syrup though and have close to the same taste)
mint, for garnish
Directions
Wash the fruit and place it in an ovenproof dish (I used a deep pyrex pie pan). Sprinkle generously with sugar. Make the crumb topping next by cutting the butter into the flour with a pastry blender or you can use your fingers. Stir the brown sugar and cinnamon into the crumb topping, and sprinkle over the fruit. Bake at 350 degrees F (180C) until the top is browned and the fruit begins to bubble, about 30-35 minutes.

Remove from the oven and let cool a bit, spoon it out into dessert dishes, top with maple yogurt and a sprig of mint.
Saturday, July 26, 2008
Daily tip - how to make the tears stop
On more than one occasion, I've stood over the cutting board with tears streaming down my cheeks until I learned the following tricks. Why? Onions, like all members of the allium family are full of amino acid sulfoxides, which give these vegetables their distinct bitter flavor. When onions are sliced, enzymes called allinases are released and react with the sulfoxides and create sulfenic acids. Sulfenic acids are extremely unstable and can form syn-propenethial-S-oxide. Why does this matter? It's this chemical that irritates your cornea and ciliary nerve in your eye and makes you tear up.
How to resolve this? There's a few options. Refrigerate onions thoroughly, or stick them in the freezer for just a few minutes (be sure not to let the onion freeze) before you slice them. Another alternative is to cut off the top but leave the root on the onion. Or, you can cut onions under water or soak them before slicing. Interestingly, onions with a higher water content (Walla Walla, Vidalia, etc.) do not cause as many tears. Of the "normal" generic onions, white onions have the most water, followed by yellow and then red.
How to resolve this? There's a few options. Refrigerate onions thoroughly, or stick them in the freezer for just a few minutes (be sure not to let the onion freeze) before you slice them. Another alternative is to cut off the top but leave the root on the onion. Or, you can cut onions under water or soak them before slicing. Interestingly, onions with a higher water content (Walla Walla, Vidalia, etc.) do not cause as many tears. Of the "normal" generic onions, white onions have the most water, followed by yellow and then red.
Following yesterday's tip - another way to prevent tearing is to use a very sharp knife. A sharp knife does less damage to the onion's tissue and thus doesn't release as many allinases.
Goat cheese and spinach scramble

We don't eat eggs often, and when we do - it's almost always a weekend morning. This scramble pairs goat cheese, fresh peppers, red onion and spinach and is accompanied by buttermilk biscuits with sweet cherry spoon fruit and fresh baby roma tomatoes.
Ingredients
4 eggs, beaten
1 small sweet red pepper, diced
1 small yellow pepper, diced
1 slice red onion, diced
1 large handful fresh spinach
4 oz. soft goat cheese
cholula
freshly cracked black pepper
Tear the spinach into small pieces. In a non-stick skillet over medium heat, soften the peppers. Add the beaten eggs and begin to scramble. Once eggs have begun to set, add the spinach and goat cheese. Once eggs are set, split among plates and garnish with diced red onion, black pepper and a few splashes of cholula.
Friday, July 25, 2008
Daily Tip - Knife Storage
Perhaps more than any other item - a cook's most important tool is a properly sharpened knife. One of the biggest mistakes that people make, which can seriously damage the knives and unintentionally hurt someone is improperly storing kitchen knives.
You have a few different options on how to store (and transport - should it be necessary) your knives.
1. Plastic sheaths - often used by people who store knives in a drawer, or for transport purposes. To use these, simply insert the end of the knife into the notch as if you were slicing and then ease the rest of the knife into the sheath. These help keep knives sharper longer.
2. In-drawer storage - typically made of wood or high density plastic - this is a great option if you have an extra kitchen drawer to set aside for this purpose. Unfortunately, I don't have the drawer space, so I can't use this option.
3. Counter blocks - typically made of resin or wood, they keep knives within arm's reach on the countertop and sorted. So you bought your knives separately and not as a set? No worries - a knife block can be purchased on it's own (and hold up to 20+ knives, plus room for a sharpener, kitchen shears, etc.). This is what we use, and an extra tip - if there are vertical slots in the block, store the knives blade side up, so you don't dull the knife while it's just sitting in the block.
4. Wall mounted block - these can be a great option depending on your storage space. You'll need to measure carefully with your longest knife to make sure that removing that knife won't be impeded by cabinets or other equipment.
5. Under cabinet storage - great for small kitchens. In my first apartment, I had ONE drawer (that was about six inches wide, tops) and a measly bit of countertop that was at most a foot square. This would've been ideal for that place.
6. Knife rolls - although these are generally used only by professionals and hunters transporting their knives to and from work. When I was taking the brown line on the el everyday to and from work, there must have been a culinary school close by - as there would be numerous people on the train in their houndstooth chef pants and with their knife rolls. I always tried to ride in the car with them, as I figured at least if trouble broke out - someone would be well equipped to defend themselves! In the interest of safety, the best option is to transport your knives individually sheathed.
The old adage is definitely true - a dull knife is a lot more dangerous in the kitchen than a sharp one. If you're lamenting how dull your kitchen knives are, fret not. You can sharpen them at home using a sharpening steel, a sharpening device or a whetstone. If you're worried about improperly sharpening your knife - many kitchen specialty stores will do it for you, or can recommend someone in your area. For those of you in the Chicago area - on Saturdays at the Naperville farmer's market "Tony" does an excellent job. At the entrance, you'll see him with his giant whetstone wheel.
Thursday, July 24, 2008
Strawberry Bread

My favorite part of summer is eating fresh berries with a splash of cream. This bread can be served with vanilla ice cream for dessert, or could be sliced and used in place of plain bread for delicious french toast.
Ingredients
1 1/2 cups sliced fresh strawberries (this is roughly approximate to 1 pint - a lot of times I throw in a few extras)
1 cup granulated white sugar, divided
1 1/2 cups all purpose flour
1 tsp baking powder
1/2 tsp baking soda
1/4 tsp salt
2/3 tsp Vietnamese Cassia cinnamon. If using "regular" cinnamon, use a full tsp.
2 eggs
1/2 tsp. vanilla
1 stick of melted butter (not too hot! - just barely melted)
Instructions
Preheat oven to 350 degrees. Lightly grease and flour or use non-stick cooking spray inside a standard size loaf pan. Rinse, core and slice the strawberries. A bonus hint for the day - a tomato corer works wonders for coring strawberries. Sprinkle with 1/2 cup of the sugar. In a large mixing bowl, blend together the remaining sugar, flour, baking powder, baking soda, salt and cinnamon. In a medium bowl, beat the eggs until just foamy, add the vanilla and melted butter. Stir in the strawberries. Combine the two mixtures, blending until the dry ingredients are just moistened through. Scrape the batter into the pan and bake for 60-70 minutes, or until a toothpick of piece of uncooked spaghetti inserted into the center comes out clean. Remove the pan from the oven and cool on a wire rack for 20 minutes before removing the bread from the pan.
The first time I tried this recipe (largely adopted from one we picked up while perusing Penzeys Spices - www.penzeys.com) I wasn't so sure about the cinnamon and strawberry combination, but after we ate the loaf we agreed it was heavenly. I buy my cassia cinnamon from Penzeys, and while it's spicier and more intense than regular cinnamon the taste is incredible.
There are a few things that I think one needs to spend money on to buy quality kitchenware namely... good properly sharpened knives, good cookware, and good spices. Once you've used good quality items in these categories (it took me 25 years before I did for some of them!), you'll never go back to using just any old thing.
After the requisite cooling time, I took the bread from the oven and ate a piece with Garofalo burro di buffala - a pale gold butter made from buffalo milk and Ficoco, a fig and cocoa spread from Croatia.
Daily Tip - Avoiding sticky situations
When measuring ingredients such as honey, corn syrup or peanut butter, lightly coat the measuring spoon or cup with non-stick vegetable oil spray. You won't lose any of the ingredient due to it sticking to the container, and you won't change the taste of your finished dish.
Wednesday, July 23, 2008
Cucumber Cayenne Salad

Since we had such a late lunch, we had a simple summer salad for dinner tonight. It was bursting with fresh flavors. The recipe follows, though you could vary it quite a bit and end up with a similarly tasty result.
Ingredients
2 medium to large cucumbers, trimmed, peeled and diced. (you can seed them, but honestly, I think that's just wasting food - and the difference isn't really noticeable in the end product)
1 tsp salt
1/2 bunch cilantro leaves, chopped (if you leave the stems in, be sure you chop these finely)
1/2 cup Mexican crema or sour cream
3/4 cup plain yogurt
2 tbsp fresh lime juice (or 1 tbsp fresh lemon juice)
1 lime (for garnish)
1 can black beans, rinsed and drained
1/3 medium red onion, diced
1 large ripe tomato, diced
1 cup roasted corn (I used the frozen bagged variety from Trader Joe's, though any cooked corn, or drained canned corn would also be good in this recipe)
1/4 to 1/2 tsp cayenne pepper (cayenne pepper goes a LONG way, but we like things spicy in our house, so we tend to overindulge)
lettuce (for serving)
Directions
Whisk together the Mexican crema, yogurt, lime juice, and cayenne pepper. Add the remaining ingredients and toss lightly. Refrigerate for a few hours to let the flavors marry before serving. Best served slightly cooler than room temperature. Garnish with a quartered lime and a tiny sprinkle of cayenne pepper over freshly washed butter lettuce leaves. While our is primarily a vegetarian household (Patrick is, I still eat meat on the rare occasion), this would also be great with chilled cooked shrimp added.
Garlic and brie ravioli
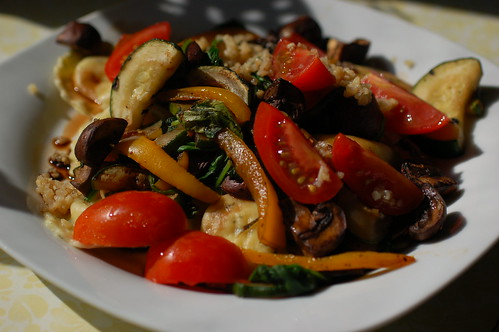
It's no secret that I love the abundance of fresh vegetables available in the summer. Today's "linner" (lunch served so late it might as well be dinner) was a delightful blend of fresh vegetables and tender cheese stuffed pasta.
Ingredients
1 package of garlic and brie stuffed ravioli. (You can use any fresh cheese stuffed ravioli. We bought a package of garlic and brie stuffed ravioli from Costco today that seemed perfect for this).
4 baby roma tomatoes
1 very large handful of organic fresh spinach leaves (another item we use almost daily that I typically purchase at Costco, I think it's an Earthbound Farm offering)
2 oz. per person of baby portobello (really, portobello mushrooms are crimini mushrooms) mushrooms, quartered
1 large zucchini, cut into half-moons (cut in half and sliced)
1 teaspoon jarred diced garlic per serving
balsamic vinegar (splurge on really good balsamic vinegar, as a little goes a long way. We use an aged balsamic vinegar from modena that we picked up from Whole Foods)
1 yellow bell pepper, seeded and julienned
splash olive oil
Directions
Put a large pot of water on to boil. Spray a grill pan/skillet with non-stick cooking spray and turn the stovetop heat on medium/high. Grill the mushrooms, zucchini, and yellow bell pepper until tender and slightly charred. Add the ravioli to the boiling water with a splash of olive oil (the oil prevents the pasta from sticking together or overboiling). Add the fresh spinach and stir frequently until spinach is wilted. Drain ravioli using a colander.
Plate ravioli, and then split vegetables up evenly amongst servings. Top with 1 tsp. jarred chopped garlic per plate along with quartered baby roma tomatoes. Drizzle 1 tbsp. balsamic vinegar over each entree.
Wine, and me.

Escudo Rojo is a winery spawned by the company Baron Philippe de Rothschild in 1997, that owns the famous Bordeaux winery Chateau Mouton Rothschild. This esteemed parentage is evidenced in the smoothness of this wine, which marries the traditional Chilean tastes with the more refined aura, and reduced tannic taste of a French wine.
The blended wine (a chilean Carménère (said to be a clone of Cabernet)- a variety originally planted in the Medoc region of Bordeaux, France and used to produce deep, full-bodied wines and the occasional blend, Cabernet Sauvignon, and Syrah) has very spicy cinnamon and pepper undertones. We've bought this wine a few times now, and have a few bottles ageing in the cellar, but would wholeheartedly endorse it as a wine to drink "now." While some wines need to be paired with food in order to bring forth their bouquet, this one is easily served on its own as well.
Carménère favors a long growing season in moderate to warm climates. During harvest time and the winter period the vine fares poorly if it is introduced to high levels of rain or irrigation. This is particularly true in poor-soil plantings where the vine would need more water. Over-watering during this period accentuates the herbaceous and green pepper characteristics of the grape. The grape naturally develops high levels of sugar before the tannins achieve ripeness. If grown in too hot a climate the resulting wine will have a high alcohol level and low balance. Carménère buds and flowers three to seven days later than Merlot and the yield is lower than that of the latter grape. The Carménère leaves turn to crimson before dropping.
Carménère is produced in wineries either as a single-variety wine (sometimes called a varietal wine), or as a blend usually with Cabernet Sauvignon, Cabernet franc and/or Merlot.
5 Fruit Salsa
Would be really good to make this time of year....
1/2 a pineapple (or almost)
1/2 a cantaloupe (or almost)
8-12 strawberries
some cilantro
3 kiwis
1 orange
1/2 a red sweet pepper (almost)
6 or so serrano peppers
lime juice-a-go-go
Chop all by hand or with a food processor, mix and enjoy with chips or as a side-dish. Much hotter than you'd expect (you can of course make it with fewer peppers).
Daily tip - Is the egg fresh?
This tip is inspired by a recent twitter from a friend wondering if an egg that was in a carton past it's sale by date was still good to use.
To see if an egg is still good - put the egg (still in it's shell!) gently in a bowl of full of 2 cups of cold water and 2 tablespoons of table salt. If the egg sinks to the bottom it's good to use. If it floats, it's too old for use and should be discarded.
Generally, eggs are good for about three weeks after you buy them.
Tuesday, July 22, 2008
Daily Tip - Too much salt?
I'm certainly not perfect when it comes to cooking duties - as evidenced by my homemade currant jam that turned into currant candy yesterday when I let it boil for too long while Julian was screaming his little head off. That said, I thought it may be helpful to offer a "daily" tip regarding kitchen how-to that I've learned over the years. A lot of this advice was given to me by my recently departed great-grandmother affectionately known as "Granny."
Today - what to do if you're a little more Dennis Kuchinich than Pat Robertson when it comes to the salt...
You essentially have a few options, depending on what it is that you're cooking. Your options are as follow:
1. add brown sugar or refined white sugar. Just a teaspoon or so may suffice depending on how much salt you've added to it.
2. if it's a soup or stew, add a thick slice or two of peeled raw potato - it tends to "suck up" the salt in the dish.
3. add a lemon juice drop by drop. Lemon juice tends to neutralize the taste of salt, but you have to be careful that you don't overpower whatever you're cooking with the taste of lemon.
4. make another batch of what you're cooking, without adding any salt, and mix them together and freeze half. Obviously, this isn't necessarily an easy fix.
5. if you've had a really bad day, and say - the entire top came off the salt shaker and you poured half a shaker worth in your dish - my advice? Open a bottle of wine and order take-out. Sometimes, that's just what you have to do.
A bountiful summer...
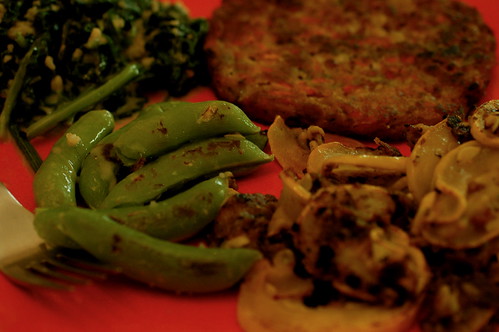
A dear friend of ours was out of town this past week, and she offered her weekly CSA farm share to us in her absence. So, our home is currently overflowing with gorgeous produce. Last night's dinner was an easy weeknight affair - a pan seared Don Lee veggie patty (by far the best prepackaged veggie patty we've found to date. We get them at Costco - and they can be stored either fresh or frozen. A package of 14 costs about $10, and they're wonderful. The package touts them as "A delightful harvest of fresh carrots, onions, celery and bell peppers are blended with bread crumbs, delicate seasonings, and crunchy sunflower seeds to create a patty that is light and moist, yet firm enough to grill").
Accompanying the meal was roasted sugar snap peas with grey fleur de sel, garlic spinach with cheese and pan fried summer squash. Recipes for each of these yummy sides follow:
Roasted sugar snap peas Preheat oven to 375. While the oven is heating, pinch the ends off fresh sugar snap peas. Make sure you have enough for each person, and place them in a single layer on a cookiesheet. Spray with olive oil and put in the oven about 10 minutes. When removed, sprinkle with a tiny bit of grey fleur de sel.
Grey fleur de sel or Sel Gris is a coarse, moist, organic sea salt, hand gathered from the coastal area of Brittany near the town of Guérande, France. Rich in minerals, it is unprocessed, unrefined, and unadulturated. It remains a light grey, almost light purple color because of the clay from the salt flats where it is collected. The Grey Sea Salt is not collected by machine but by hand using traditional Celtic methods.
All that aside, it's just tasty - and a teeny little pinch goes a long way.
Cheesy Garlic Spinach A variation on this dish is served in our house almost every week. Wash fresh spinach leaves (about two cups or so per person - they cook down substantially). Place in a large nonstick skillet over medium heat and stir often. Add a teaspoon of water if necessary to prevent leaves from sticking. Spoon in a heaping tablespoon of minced garlic (we use Spice World - in a blue labeled jar). The garlic can be omitted if you like. After the spinach is wilted, stir in 1 oz. of smooth melting cheese per serving. We usually use soft goat cheese but last night used a four cheese shredded Mexican blend. Stir until cheese is melted and sprinkle with freshly cracked black pepper and a sprinkle of salt-free seasoning blend.
Summer Squash Melt 2 tbsp. butter in a cast iron skillet. In a shallow dish mix 2 tbsp. white flour, 1 tsp. black pepper, 1 tsp. paprika, and any other spices of your choosing. I typically use a mix of garlic, onion powder, thyme and greek oregano. Thinly slice a summer squash and dip slices in water (you can use a beaten egg or milk, but the water works almost as well and is fat/calorie free. Dredge each dampened squash slice in the flour mixture and place in the skillet. Allow squash to brown on one side, and then flip. Cook about 5 minutes on each side. I personally like mine a little darker than golden, so I let them cook a little longer. If necessary, drain excess butter before serving.
2005 Terrazas De Los Andes Reserva Malbec

We are not wine snobs, but we're not exactly novices either. For years one of my favorite getaways has been to vineyards across the country - and in France. I try to pick up a few bottles of local wine from each place we vacation. Almost any trip to the grocery store, Costco or specialty market finds a bottle or two nestled in amongst the organic produce in our basket. It's almost a compulsion. We're hoping to eventually convert part of our basement into a wine cellar, but for now the dark cool temperatures work well for our burgeoning collection. Hint to my dear husband, as far as our vacation this summer goes - I'd love if we could work some vineyard visits in...
Last night's choice was a 2005 Terrazas De Los Andes Malbec. It's from the Mendoza region of Argentina and was laced with deep blackberry flavor. It smelled almost floral, with a slight hint of cinnamon, chocolate and pipe tobacco. This bottle was in the $10-$15 range from Costco, I believe.
Malbecs are named in homage to the Hungarian peasant who first introduced that particular grape varietal to France. They were once solely grown in France, but they were introduced by the French architectural engineer Michel Pouget in 1868 to the mild climate on the slopes of the Argentinean Andes. The Mendoza area turned out to be so well-suited to growing the grapes (and producing a less tannic-driven variety than that in Cahors) that France has essentially thrown in the towel on this varietal. An interesting tidbit of information - while the grape is Argentina's shining glory - the wine makers almost completely decimated the vineyards during the 1980s when a "vine pull" program reduced the total planted acreage to less than 10,000. The grape is also grown in Chile, France (very limited), the cooler portion of California (where it is used to make Meritage), Washington, Australia, New Zealand, South Africa, British Columbia, southern Bolivia and Northeastern Italy.
Malbec (and Tannat) are the varieties of grapes with the highest polyphenols called oligomeric procyandins (OPS), that make red wine good for your health.
This particular bottle was rated 88 points by Wine Spectator, and for the price was an excellent buy. As we eat only vegetarian meals at home, I can't attest to the pairing with meat - but imagine that it would do nicely with grilled items as it complemented the slight char on our summer squash.
One caveat - the wine did leave the tell-tale red wine drinker stigma of dark splotches on the teeth and along the gumline so be sure to rinse well after water and brush up before bed!
Monday, July 21, 2008
"Clean out the fridge" Queso
Any queso recipe must have Velveeta, otherwise the consistency gets all wrong.
1/3 a thingee of velveeta
good amount (1/2 cup?) of chihuahua cheese
1/4 cup of mozzarella cheese (what i had left)
couple of pinches of fresh grated parmesan
4 roma tomatoes (chopped)
1/4 cup (roughly) chopped cilantro
1/2 cup nopalitos (prickly pear cactus...get the prepared "nopalitos" rather than actual nopales, unless you're a masochist)
some red onion
dried serrano pepper seeds from 10 or so peppers
lime juice
warm in a double boiler and garnish with queso fresco and cilantro.
Gratin of Zucchini, Eggplant and Chickpeas with Goat Cheese

As I was pulling tonight's dinner (Gratin of Zucchini, Eggplant and Chickpeas with goat cheese, recipe follows) out of the oven, Benny came tearing into the kitchen and hopped up on the chair next to the table where I set it to cool. He didn't actually eat any (the same cannot be said about the squash I sat out on the table today).
Gratin of Zucchini, Eggplant and Chickpeas with Goat Cheese
Greatly inspired by the recipe in the Williams-Sonoma Vegetarian cookbook.
Ingredients
1/2 cup dried chickpeas (garbanzo beans)
1 medium eggplant
2 medium zucchinis (courgettes)
1 tbsp. olive oil
2 small white onions, sliced
1 large sweet red bell pepper
2 tbsp. minced garlic
1 cup chopped tomatoes (you can use any kind, I used a combination of yellow cherry, grape and an heirloom red)
1/4 tsp. red pepper flakes
1 tsp. chopped fresh thyme
1 tbsp. no-salt added herb blend (I used Kirkland - the Costco brand)
kosher salt
fresh cracked black pepper
1/2 cup crumbled goat cheese
1/4 cup grated goat or fresh parmesean cheese
Directions
Pick over the chickpeas and discard any damaged peas or stones. Rinse and drain. Place in a bowl, add plenty of water to cover, and let soak for at least three hours.
Drain the chickpeas and place in a saucepan with water to cover by 2 inches. Bring to a boil, reduce the heat to low, and simmer, uncovered until tender, about 45-60 minutes. Drain and set aside.
Cut the eggplant and zucchini into slices about 1/2 inch thick. Set aside. In a large non-stick frying pan over medium heat, warm the olive oil. Add the onions and red pepper and cook, stirring occasionally, until soft - about 10 minutes. Add the chopped eggplant and zucchini and continue to cook, stirring occasionally, until just lightly browned, about another 10 minutes. Add the garlic and cook, stirring, for 1 minute. Add the red pepper flakes, chickpeas and spices. Simmer for about 10 minutes.
Cut the tomatoes into small chunks, and combine in a 9x13 baking dish with the crumbled goat cheese. Pour the vegetable mixture into this dish, sprinkle the grated goat cheese or parmesean over the top. Bake until golden and bubbling around the edges, about 20 minutes.
Let cool for 10 minutes before plating. Serve with an herb green salad.
Stuffed Poblano Pepper and Strawberry Guacamole
 On one of my first visits to Chicago, Patrick and I made stuffed poblano peppers. Hands down, it is perhaps one of the best meals I've ever cooked. A flavorful burst of serrano peppers and soy chorizo, delicious melted mexican cheeses and fresh produce from the local Mexican grocery. And... we both got food poisoning from something in it, and were violently, violently ill. We've always pegged the soy chorizo as the culprit - and have never eaten it since, but who knows what it really was that made us so ill.
The recipes for this go around - still delicious but guaranteed not to make you sick - are as follows:
Strawberry guacamole:
2 ripe avocados
minced dehydrated garlic
1/4 to 1/2 of a white onion, diced
red pepper flakes
juice of 1 lime
sprinkle kosher salt
1/2 jalapeno pepper (you can seed and devein it to decrease spiciness - but it marries nicely with the sweetness of the strawberries)
6-10 sprigs of fresh cilantro [leaves only, discard the stems into the compost pile]
1 cup hulled diced fresh strawberries [if possible, get these straight from the garden or from a farmers' market - they're often much more flavorful than the strawberries sold in the grocery stores]
Directions: mash avocado flesh into somewhat chunky paste, adding garlic and red pepper flakes to taste. I'm not going to tell you an amount because we like garlic and peppers both more than most people do. Mix in juice from one lime to prevent guacamole from discoloring due to oxidation. Dice strawberries and onion and gently spoon in to the avocado mixture to avoid overly smashing them. Finely dice jalapeno and add in as much as you'd like for a bit of fire. Lightly chop the cilantro leaves and fold in. Sprinkle in a tad of kosher salt, give it another stir, and it's good to go. A tip for the guacamole from Patrick, if you're not going to serve it right away, take saran wrap and mash it down on the surface of the guacamole - the lack of air will prevent the guacamole from discoloring.
For those of you with a Meijer around, the Meijer Organic Corn Tortilla chips (they come in yellow and blue) are delicious.
Stuffed Poblano Peppers
one large pattypan squash
one large vine ripened tomato
one fresh jalapeno
one fresh poblano pepper for each person you're serving - this recipe made three)
1/2 cup roasted corn (I used Trader Joe's - in their freezer section. It's delicious and easy, though fresh would've been even better)
1 large sweet red pepper
1/2 white onion
1 pint of baby portobello mushrooms, cleaned and quartered
2 tbsp. crumbled queso fresco
3 tbsp. jarred jalapeno juice
1/3 cup shredded cheese per pepper. I used a four cheese mexican blend from Costco - but some Habanero Jack would've been great too.
Adobo Sauce - I used Dona Maria paste, and follow the direction on the back of the jar to reconstitute enough to drizzle over the peppers.
Directions
Cut all the vegetables except the poblanos into small pieces. Grill on the stovetop in a non-stick skillet until tender. While these are cooking, make a t-shaped cut close to the stem of each poblano and slice it down the length (being sure not to cut through the back of the pepper). Place into a baking dish and broil until the outer skin of the poblanos start to bubble up and char.
Remove cooked vegetables from stovetop and mix in 2 -3 tbsp. jarred jalapeno juice. Stuff the peppers with the vegetable mixture, and then the shredded cheese. Drizzle adobo sauce over the peppers and sprinkle crumbled queso fresco on each pepper. Bake in 375 degree oven for 20 minutes, until heated through and the poblanos are tender.
The poblanos are also good stuffed with beans (refried or whole) and basically any combination of vegetables that you have.
April's Southern Style Banana Pudding

Banana pudding was a fixture in my mother's family for holiday meals - always prepared by my great grandmother - "Granny". Granny also always made a "cherry salad" (a concoction consisting of cool whip, cherry pie filling, coconut, pecans, sweetened condensed milk, crushed pineapple, mini-marshmallows and maraschino cherries). I can't say that I miss the cherry salad that much, but the banana pudding - I really long for at times. Granny's recipe for banana pudding was actually a recipe for banana cream pie filling - from a 1940s two-volume "Encyclopedia of Cooking." I have those cookbooks now - their pages dogeared and stained. Today I was craving comfort food that reminded me of my childhood.
So I folded and made homemade banana pudding. My recipe, which differs quite a bit from her old stand-by follows. And no, it is not "good" for you - despite the addition of bananas. But it is quite good.
Ingredients
1 cup sugar (cane sugar works best, but plain old granulated white sugar is fine too)
1/2 scant cup all purpose flour
1/2 tsp. salt
3 cups skim milk (1 cup set aside - I'm sure that 2% or whole would be decadently good - but well, we only use organic skim - so that's what I used in the recipe, and it was plenty rich)
1 can evaporated milk (will be about 1.5 cups - do NOT use sweetened condensed milk - it is NOT the same thing)
1 tsp. (or more - I use a little more) of vanilla. Do not use artificial vanilla extract - buy the real thing. I buy mine from a Latin market - imported from Mexico. It's delicious and I'm sorry but the fake stuff just doesn't compare.
1 tbsp. unsalted butter (NOT margarine)
3 egg yolks (throw the whites out, make an omelet, I don't care - but in my family, banana pudding does NOT have meringue on it)
4-5 ripe bananas
1 box of Vanilla Wafers (use the "real" thing - not a knock off).
Tools you'll need: a deep pan, a glass bowl of some kind to serve it in (you can use a 13x9 casserole dish, or any size pan really - but I like the way it looks in a clear glass bowl), a decent whisk, a glass measuring cup or bowl and measuring spoons.
Directions
Open the evaporated milk and pour it along with 2 cups of the milk into the pan and set the heat on the stovetop to a medium high. You want to slightly scald the milk. Once scalded, turn it down just a bit. Add the butter, chopped into little bits. Reserve the other 1 cup of milk for later. Add the 1 cup of sugar and salt and whisk into the warm milk. While the sugar dissolves into the milk, separate the eggs, and put the yolks into a glass measuring cup. Beat until yellow and lightly frothy - and add the vanilla directly to the egg yolks. If the eggs you use are particularly small, you can use four.
Slowly sprinkle in a little bit of the flour at a time into the warm milk and sugar mixture while constantly whisking until all is incorporated. Continue cooking over medium heat until thickened to the consistency of very thick pudding. Take off of heat, and put about 1 cup of the heated pudding into the egg yolk and vanilla mixture. Quickly mix together, and then pour back into the pudding in the pan (this keeps the eggs from curdling or turning into scrambled eggs). Keep off heat and whisk thoroughly every five minutes or so.
In the meantime, open the box of Vanilla Wafers (go ahead and feel free to steal a few to snack on, but don't get crazy). Layer one full row on the bottom of whatever bowl you will serve the pudding in. Peel bananas and slice thinly. Put another layer over the vanilla wafers.
After the pudding mixture has cooled, whisk in another 1 cup of cool milk to thin it a little (as it cools, it will thicken up surprisingly). Pour 1/3 of the cooled pudding mixture over the bananas in the serving bowl. Repeat layers - ending with vanilla wafers. Cover with saran wrap and refrigerate for at least two hours. Serve with a sprig of mint or a dollop of whipped cream.
It's amazing comfort food - that was present at every church social I can remember. Unfortunately way too many people rely on boxed pudding mix - which is just horrendous. Homemade sounds like a lot of work, but all together it takes about 30 minutes to prepare, plus extra refrigeration time. Apparently the dish doesn't have much of a following outside of Texas and the south - but try it. You'll thank me later. Your hips won't... but your tastebuds will.
Rhubarb Sangria
 1 bottle of rhubarb wine (I used a bottle from a winery in Vermont - I've been holding on to the bottle for a ridiculously long time, but you could use any other fruit wine of your choosing)
1 sliced kiwi, skin removed
1 lime, sliced
1 handful of blueberries (20 or so)
2 small apricots, pitted and diced
1/2 nectarine, pitted and diced
1/2 a large starfruit, sliced
20 ripe bing cherries, halved and pitted
splash of pomegranate liquor
simple syrup to taste
stir lightly, refrigerate for 2 hours and enjoy.
Pumpkin Spice Cake

Ingredients
1/2 cup plain applesauce
1/2 cup vegetable oil
3 eggs
1 (15 ounce) can pumpkin puree
1 teaspoon vanilla extract
2 1/2 cups white sugar
2 1/2 cups all-purpose flour
1 teaspoon baking soda
1 teaspoon ground nutmeg
1 teaspoon ground allspice
1 teaspoon ground cinnamon
1 teaspoon ground cloves
1/4 teaspoon salt
1 tbsp. maple sugar
1/2 cup chopped roasted pecans (may be omitted)
dried cranberries
cream cheese frosting
1 tbsp. maple syrup
Directions
Preheat oven to 350 degrees F (175 degrees C). Grease one 10 inch bundt or tube pan. Do not forget this step, or your cake will remain stuck in your pan and you will NOT be able to get it out in one piece.
Cream applesauce, oil, beaten eggs, pumpkin and vanilla together.
Sift the flour, sugar, baking soda, ground nutmeg, ground allspice, ground cinnamon, ground cloves, maple sugar and salt together. Add the flour mixture to the pumpkin mixture and mix until just combined. If desired, stir in some chopped nuts being sure to reserve a few for garnish. Pour batter into the prepared pan.
Bake at 350 degrees F (175 degrees C) for 1 hour or until a toothpick inserted in the middle comes out clean. Let cake cool in pan for 5 minutes (on a wire rack is best) then turn out onto a plate. While still warm (but not hot) mix together some cream cheese frosting (you can use prepared icing) and a tablespoon of maple syrup. The mixture will be thin. Drizzle over cake. Garnish with dried cranberries and roasted pecan pieces.
The cake is very dense, and is only slightly sweet. Nicely accompanied by apple cider.
Banana Split Bread

My first "real" job aside from babysitting was as a drink/ice cream girl at Sonic the summer I turned 14. One of the favorite items on the menu for customers during the sweltering Texas summers was a banana split.
This quick bread is a twist on those flavors strongly reminiscent of many childhood afternoons. It's delicious warm out of the oven, but would be equally good at room temperature. I imagine the tastes would be greatly enhanced with a scoop of homemade vanilla ice cream on the side. If there was a way for me to buy Bluebell ice cream up here - sigh... that would be dangerous.

Ingredients
- 1-1/2 cups all-purpose flour
- 2/3 cup sugar
- 2 teaspoons baking powder
- 1/4 teaspoon baking soda
- 1 egg, beaten
- 1/4 cup crema Mexicana or sour cream (you can use a low-fat version if you want)
- 1/4 cup fat-free milk
- 1 teaspoon Mexican vanilla. (I always use Mexican vanilla in baking. Trust me, once you've used it, you won't ever use artificial vanilla flavor willingly again)
- 2/3 cup mashed red bananas (about 3 red bananas. Look for them in the produce section, and pick ones that have reddish/purple skin. They have slightly pink flesh and almost a raspberry laced flavor). You can use the "normal" Cavendish banana, but if you do, you'll only need about 2-3 medium bananas, and the flavor will be a little less intense.
- 8 maraschino cherries, drained and chopped
- 1/2 cup chopped pecans
- 1/2 cup miniature semisweet chocolate pieces
- 1/2 cup sliced fresh ripe strawberries
- Nonstick cooking spray or butter - to grease inside of pan
- Preheat oven to 350 degrees F. Lightly coat the bottom and sides of a 9x5x3-inch loaf pan with nonstick cooking spray; set aside.
- In a large bowl, stir together all-purpose flour, sugar, baking powder, and baking soda. Make a well in center of flour mixture; set aside.
- In a medium bowl, combine crema, milk, and egg. Stir in mashed banana and vanilla.
- Add crema mixture all at once to flour mixture; stir just until moistened (batter should be lumpy). Fold in chopped cherries, pecans, strawberries and chocolate chips.
- Spoon batter into prepared pan. Bake for 40 to 45 minutes or until a toothpick inserted near the center comes out clean. Cool in pan on a wire rack for 10 minutes. Remove bread from pan. Cool completely on wire rack. Makes 16 slices.
Subscribe to:
Posts (Atom)